Category

Puppy & Kitten Care

Proper Ear Cleaning Can be the KEY to preventing ear infections!

By General Pet Care, Puppy & Kitten Care No Comments

Proper Ear Care Can Be The Key to Preventing Ear Infections.

Inflammation of the outer ear canal in dogs and cats can be one of the more frequent reasons that a pet is brought into the clinic for veterinary care.  While cats seem to be less frequently affected by ear troubles, up to 20% of dogs can be affected by ear infections at any one time.  Unlike our ear canal, the ear canals of our pets are actually “L”-shaped which allows water and dirt to sit deep in the ear for extended lengths of time.  The primary cause of any ear infection can actually be very complicated and may involve a combination of the following:  the ear’s physical characteristics (upright vs. floppy, having hairs in the canal), the activities of the animal (swimming, digging, hunting), the presence of parasites, foreign objects, improper cleaning, or allergic conditions.  Even the weather can affect the ear and lead to an infection.

As with any infection, it is important to visit your veterinarian as soon as possible, to limit the secondary problems that may occur when a problem is left too long.  When an infection is allowed to continue untreated, the upper ear canal can swell in response to the problem, just as our skin swells when it is irritated.  This swelling can actually worsen the ear condition, by preventing medication from getting down to the base of the ear where most conditions begin.  Also, this swelling stops air from reaching the area of infection, contributing to the severity of the condition.

 Steps to Caring for Your Pet’s Ears:

  1. With your pet standing and head in a vertical position apply enough ear cleaner to fill the ear canal, then gently massage at the base of the ear for about 5-10 seconds (Fig. 1 – Fig. 2)
  2. Allow pet to shake head to loosen debris in the horizontal part of the ear canal, then use cotton balls to wipe out and dry the accessible portion of the ear canal & ear flap (Fig. 3 – Fig. 4) Avoid use of cotton tipped applicators.
  3. Check your pet’s ears regularly – normal ears appear pale pink, dry and clean.

Ear1 
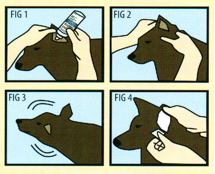
(from a Scan from EpiOtic Cleaning information 2001)


Resolving Storm, Fireworks, and other Anxieties in your Dog

By Pet Behaviour Concerns, Puppy & Kitten Care No Comments

This article is primarily directed at the reduction of anxiety for dogs however, there is a similar approach for your cat as well! Please look for my cat anxietal blog entry elsewhere in our website!  Most of the references in this blog pertain to veterinary services in Halifax, Dartmouth, Lower Sackville and the Halifax regional municipality in general.

Typically, anxieties worsen over time, so you need to have some plan in place two months ahead of fireworks season or, the season for thunderstorms.  Also, before you book an appointment your veterinarian, it is a great idea to contact the obedience or behavior trainer that you took your puppy to for his or her basic life skills training. If you did not do this with your puppy-I can’t stress enough the bonuses for everyone in your family from taking these courses!  While attending behavior training classes may seem somewhat of a “chore”, these classes will remarkably improves the bond with your pet. Many of our clients who attend puppy skills training while the puppy is still 6 to 8 months of age.   However, about 30% of our clients will go when the dog is somewhat older and are amazed at the results. Specifically for this blog, a refresher course focused on methods to improve your dogs “self-confidence” can go a long way to reducing anxietal behaviors. This training basically helps your dog understand what’s accepted behavior from them, what’s expected of them in general, and of course what they can expect from you.

Some basic considerations for lessening anxietal behaviour(s) during thunderstorms or if you can anticipate fireworks celebrations or other anxiety-causing situations for your dog;

1 – Consider creating a safe & secure environment for your dog might be an area that is his or her “favorite” area to lie down at any time. It may be a good idea to try and pre-train your pet to go and settle on a mat, bed, couch or similar location as this strategy can help to increase calming behaviours.

2- However, if your dog finds a hiding place as a storm is coming or during a storm, don’t acknowledge this behaviour either way-that means not discouraging or encouraging the behaviour.

3- Playing music may assist in reducing his anxiety however, I think it’s more likely that having a circulating fan blowing on the area this is their’ favorite’ may also assist in adding “white noise” and lessen your dog’s anxiety, by masking some of the more subtle storm sounds.

4- Encouragement or praise may actually not be helpful as your pet could interpret them as reward for the behaviour.

5- I like to hear of clients playing with their pet during the prelude to any storm or stressful situation. Engaging in games or even practicing some basic obedience exercises can actually distract many pets, especially playing with familiar toys.

‘ThunderShirt’ Use

These are close-fitting ‘coats’ that are adjustable with Velcro fittings but, I would recommend that you take your pet to either ‘PetSmart’, ‘Pet Value’ or Pets Unlimited to have it fitted correctly.  They are slightly adjustable as well to allow you to fit it slightly tighter or looser as the need arises.

Pheromone Use

‘Adaptil’, a pheromone product that is thought to lessen anxieties overall as the pheromone mimics those pheromones given off by nursing mother dogs.   I’m trying this with my own dog currently, and it comes in 3 basic forms; a spray, a collar, & a plug-in diffuser. I’m currently using the spray and the diffuser at home.

Initially you need to buy a diffuser for the “Adaptil” start and, then it’s about $30 a month thereafter; while the spray is $ 58 but it is challenging to tell you how long it would last, as would depend on how frequently you used it however, they recommend 8 individual “pumps” per treatment session.  Typically the caller is used for puppies adjusting to their new home, and lasts about a month. One of my technicians is found this very helpful for her puppy!

We use the Adaptil diffuser in the clinic and each one covers 600 to 800 ft.². We also use the feline version “Feliway” for our cats as we are also a “Certified Cat Friendly” clinic by the American Association of feline practitioners – as cats can have anxieties too!

Additional Treatment Modalities & Medications

There is a calming food from the company “Medi Cal” in Canada – “Calm” is its name.  In our practice, we have had some profoundly great effects using only this diet. Our only client feedback that is negative is because the size of the bag is quite small.  This diet combines 3 natural additives that are known to reduce anxiety.  These are Tryptophan, Nicotinamide, and a milk protein hydrolyzate – See more at: http://www.royalcanin.ca/index.php/Veterinary-Products/Canine-Nutrition/Veterinary-Therapeutic-Formulas/Calm-Dry.

I have had some clients obtain the above three ingredients separately from health food stores but at this time, I’m unaware if this is available on our part of the country.

During thunderstorm/firework season drug therapy can be helpful as an addition to the above ideas. No medications are approved for use specifically for storm reactions, but two are approved for the treatment of anxiety-related conditions; Clomicalm® and Reconcile®. Please ask your veterinarian to look into the cost for these medications for your pet as the dose is weight related.  Either of these medications take 2 to 4 weeks for full effect.

Depending on your pet’s response to one of these medications, you may not need any additional therapy or, can add in other medications such as ‘acepromazine’ (sedative/tranquilizer) or  ‘alprazolam’ which is a family member of the valium group however, it has very little sedative effects and no addictive qualities.   The really great news about these two medications in combination is that, once we see the desired effect, and it is consistent for the first 3 months of storm season, we can begin to reduce the dose by 25% (one quarter), every 3 weeks to the lowest effective dose, while watching for a return of any anxiety indicators such as pacing, whining, loss of appetite.

There could be the consideration of the use of Clonidine with Trazodone for anxiety-based behaviour disorders in dogs. However this combination needs to be discussed at length with your veterinarian and preferably should be started about a month or six weeks before any ‘season’ of fireworks are anxietal issues.

If your pet begins to worsen during the dose reduction period, you can always increase it to the last effective dose as well. Again, any dose changes need to be discussed with your veterinarian at length so that both of you know what is going on!

Generally your veterinarian should be able to counsel you by phone or e-mail once you have attended the initial consultation with your pet. And don’t be surprised if it takes some time for some tailoring of the doses of medication combined with the Thundershirt or pheromone use, or for other behavior techniques to have the desired effects.

Submitted by Dr. Jeff Goodall, Veterinarian/owner of Sunnyview Animal Care, and you’re Halifax Regional Municipality dog, cat, and exotic pet veterinarian.  We are based in Bedford, Nova Scotia

Does My Dog Require A Distemper Vaccination?

By Puppy & Kitten Care, Vaccination Discussion No Comments

Does My Dog Require a Distemper Vaccination?

The Canine Distemper Virus is a contagious virus of dogs, ferrets, skunks and raccoons, spread by direct contact that is almost always fatal – affecting the Nervous, Gastrointestinal, and Respiratory systems.  Distemper can be spread over short distances by coughing or sneezes as well.

The Distemper Vaccines used by many veterinary practices in Canada are approved for three-year interval use and, when used in a rotation with Parvovirus and Rabies vaccination – have a profound and positive effect on your dog’s health.

In Nova Scotia, Distemper shows up primarily in our racoon population as recently as late 2013 in the Mount Uniacke area, and is seen so often that posters remain up in Point Pleasant Park, Halifax, Nova Scotia!  The apparent clinical signs of this virus vary from obvious eye and nose discharges in wildlife, progressing to seizures – but in addition to these signs, in our dogs we see vomiting and diarrhea that rapidly progress to those signs outlined above.

While a dog that contracts this virus will have life-long immunity, that dog will also suffer from seizures, twitches (chorea), and general poor health.  Treatment is directed at supporting the pet through the seizures, vomiting, diarrhea, and secondary bacterial infections that occur.  Unfortunately, the rate of recovery is very poor.  This virus is not infectious to people and is NOT related to the Feline Distemper Complex Virus we also vaccination our Cats for.

Please make the time to review the AAHA Canine Vaccination Guidelines here – https://www.aahanet.org/PublicDocuments/CanineVaccineGuidelines.pdf, and you can see where the three year core vaccination protocol used at Sunnyview Animal Care is derived from.

The Team at Sunnyview Animal Care, (your Bedford Veterinarian) hopes this helps you and your dog on your journey together in the best possible way!

Puppy House Training ‘101’ from Sunnyview Animal Care

By Puppy & Kitten Care No Comments

Puppy House Training 101 – by Jeff Goodall, Veterinarian, Sunnyview Animal Care

Always remember we need to reward good behaviour with lots of praise and petting – treats are not always needed.  Many dogs with this program will housetrain within a few weeks – No kidding!  We use these tricks here at Sunnyview with great success.  A few days or weeks of extra attention is a small discomfort for you & your puppy in order to get this part of training finished.  You will both learn your puppies’ habits and, bond you & your family to your puppy quickly!

Things you will need:

  •  A Dog Carrier/Crate
  • Timer
  • Pick a place outside for your puppy to consistently use for relieving themselves
  • Leash
  • Cat Treats (You’ll see – read on!)
  • Bell & strong cord (if you want to train your pup to tell you when he or she needs to go outside)

1) First start with the Carrier – it needs to be large enough for your puppy to stand up in, turn around, and lie somewhat stretched out.  Where you place it is up to you, but be prepared for some crying for the first few nights – and don’t reward the crying that might happen for the first few nights.  You puppy needs to be left in this carrier for the night and, anytime you go out whenever possible.

Confining your puppy to a room with a tile/linoleum floor for house training sounds like a great idea – but the smaller confines of the carrier use your puppies’ innate desire not to soil their ‘nest’ or home.  Also, many times we see puppies for ingestion of baseboard or other items (including the flooring sometimes) that happen in these small rooms.

There is an exception to not using the crate for training – shelter or rescue dogs likely have had experience with not begin taken out as often as needed, and therefore the need not to soil where they live & sleep has been lost.  Then use the room, covered in paper if possible when you go out, so you do not have to continually bathe & clean your dog anytime they would soil in a smaller crate.  Towels or ‘Pee Pads’ are discouraged for this use, as your puppy may find them a tempting chew toy.

Aside – The general rule for how long you can leave your puppy unattended in their crate without an accident is their age in months, plus 1 – converted to hours.  Therefore a 2 month old pup can be left and expected not to have an accident for 3 hours.

For the size of the crate – it should be just larger then the puppy itself, with enough room to stand up, turn around and, lie down with their legs tucked under themselves.  Many ‘handy’ clients buy a larger crate and build a sturdy dividing wall that the puppy cannot chew nor get around – securing it firmly to the sides in the process.  Then it is moved as the puppy grows.  Too large a crate is just a bad as using a large room for training!

2) Next, buy an inexpensive kitchen timer or two – you will use this to train yourself and your family to remember to let your puppy out.

3) Pick a place away from your house for your puppy to use for deification and urination.  Ideally, you will be able to leave a stool or two there for the first few days to a week, so your puppy knows its his or her ‘safe spot’ to use.

In general, the use of ‘Pee Pads’ in the home is not a great idea – your puppy will likely become confused & extend the house training period.  Also, the same goes for training your puppy to use the back deck.  We have had owners who train their puppy to use ‘Pee Pads’ while they are living in an apartment building, only to have significant challenges in re-training their adult dog once they move into a home later in their lives together.

4) Set a schedule for feeding & set your puppies’ schedule.  Puppies under 12 weeks of age should be fed 3 times a day and, we can use this to our advantage for housetraining!  Place the food down for 10-15 minutes to encourage them to get into a habit to eat regularly – and then leash your puppy to you and expect that they will need to relieve themselves within 15 minutes of eating.  Watch for your puppies’ signs of wanting to go – sniffing, trying to hide, vocalizing, etc.

Aside – remember to wiggle your fingers in your puppies’ food while they eat so they understand not to become possessive of their food – encourage all members of your family to do so, and in a week or so, a friend or two that are visiting at feeding time.  Also, use the feeding opportunity to “bait” your puppy into a sit position by lifting the bowl over their nose.  Some of the more exuberant puppies will struggle with this for the first few days – feeding time is a happy time!

5) Set a schedule for yourself and your family – anticipate that your puppy will need to ‘go’ as soon as you wake up in the morning, within 15 minutes of eating, and likely anytime after playing.  You will need to be aggressive in taking your puppy outside every 30 minutes for the first week when anyone is home with your puppy.

6) Get your puppy to the door ‘on time’ – First, for this to work most effectively, pick one door in the home to use.  Second, at this door, have your coat, umbrella, your puppies’ lead, and cat treats handy so that when the timer goes off – there is no wasted time in getting outside.  This applies to apartment dwellers as well.

7) Set the timer – for 15 minutes after eating, and for 30 minutes whenever you are home.  Every time the timer goes off, pick your puppy up and get them to the door.  Encourage your puppy to ‘sit’ and try to engage them with eye contact while you get your coat on & get ready. Carry your puppy to the spot you want them to ‘favour’ over others – we cannot stress this any more fully – walking your puppy to their spot just won’t work for a few months.

Wait for 3-5 minutes – possibly longer for the first few days, while your puppy comes to understand what is expected of them.  When they go – a lot of praise (alot!) and, a cat treat or two – dogs love them!, and a good quality one will be low in calories, no additives or food colouring.  Remember to just use this treat for house training however.

Aside – a lot of verbal praise and, repeating the words ‘Pee’ or ‘Outside’ or whatever word you are most comfortable with – and consistently use that word as your puppy relieves themselves, setting up word & action association.  The more excited you sound – the more the puppy will be excited to please you!

Once you learn your puppies’ schedule for relieving themselves – you can cut the time down that they are outside.  IF you have been walking for more then 5 minutes and, its clear your puppy does not need to go outside, thats ok.  Just scoop them up and, carry them back in the home – don’t forget to RESET the timer!

8) What if your puppy does not go when you expected them too(?), or its been the 3rd or 4th time you have taken them out to pee and, they keep getting distracted?  This is the time to leash them to yourself and, reset the timer for another 30 minutes.  Don’t allow your puppy to fail – and they won’t.

Also, in the first week or two, it is a great idea to get up with your puppy twice nightly in the first few weeks to have your puppy relieve themselves and, then once nightly for the next few weeks as well.  Feeding your puppy 3 hours or more before bedtime will allow them to sleep through the night, but don’t try this right away – use the opportunity of their need to go in the middle of the night to your advantage!  Carry your puppy to the door, have them sit, carry them to their spot – and lots of reward words and treats!


People at coffee parties will be envious of your ability to train your puppy in less then 3 weeks!


Bell Training – once your puppy is through the first 3-4 weeks of training, your puppy is starting to hold out for more then an hour – and you are working on your puppy socialization classes with a reputable trainer, you can also look at working with your puppy to tell you when they need to go and avoid the timer.

Get a good sized Christmas or Bear Bell and, some very stout rope.  Tie  the bell to the door handle of the door you have trained them to just slightly above the level of their nose.

Anytime your timer goes off, walk to the door (likely puppy will be too) and call the puppy in your happiest voice.  This will trigger their excitement to get to the door.  Have the puppy sit as usual, and get your coat on (& umbrella as it seems to always rain during training) and, just before you open the door – hit the bell and use the keyword associated with the process.  I.E. “Puppy want to go Pee?”, and hit the bell.  Soon with consistent repetition, your puppy will be nosing the bell for you – the key will be to listen for it!

The Team at Sunnyview Animal Care hopes this helps you and your puppy get started on your journey together in the best possible way!